Developing with WATcloud
You must complete your Cluster Access Form (opens in a new tab) before proceeding with this guide.
Here, we discuss setting up WATcloud to be used for software development in the Autonomous Software Division.
Why WATcloud? What is WATcloud?
Due to the high computational requirements of many aspects of the ASD stack, WATO has a large server infrastructure for remote development WATcloud (opens in a new tab). In this section, you will learn to connect to WATcloud on VS code. Connecting to a server to do remote development is not only a crucial aspect of software development at WATonomous, but is also a very common practice in the industry.
Fun Fact: WATcloud closely mimics server infrastructures used by OpenAI, NASA, Nvidia, and more!
A Look from Afar
How does WATcloud share compute resources fairly?
WATcloud relies heavily on a resource management tool known as SLURM (opens in a new tab). SLURM ensures that all resources in WATcloud are shared in a fair and well-managed manner.
For the everyday developer, you can imagine SLURM as a "build your own computer" tool. You specify to SLURM what compute resources you want (CPU, RAM, GPU, memory, time limit, etc.) and SLURM will build a compute node with the resources it has on hand.
So how does remote development actually work?
Remote development for a WATonomous member typically consists of a local machine, host machine, SLURM node, and a docker container. They are defined below:
Local MachineYour personal computer.Host MachineThe computer you connect to. In the case of WATcloud, this is the SLURM login node.SLURM NodeUsed to manage compute resources. It creates SLURM Jobs according to your needs.SLURM JobAn "imaginary computer" that is created by WATcloud. You specify to WATcloud what compute you need by running commands in the SLURM login node.Docker ContainerAn isolated coding environment.
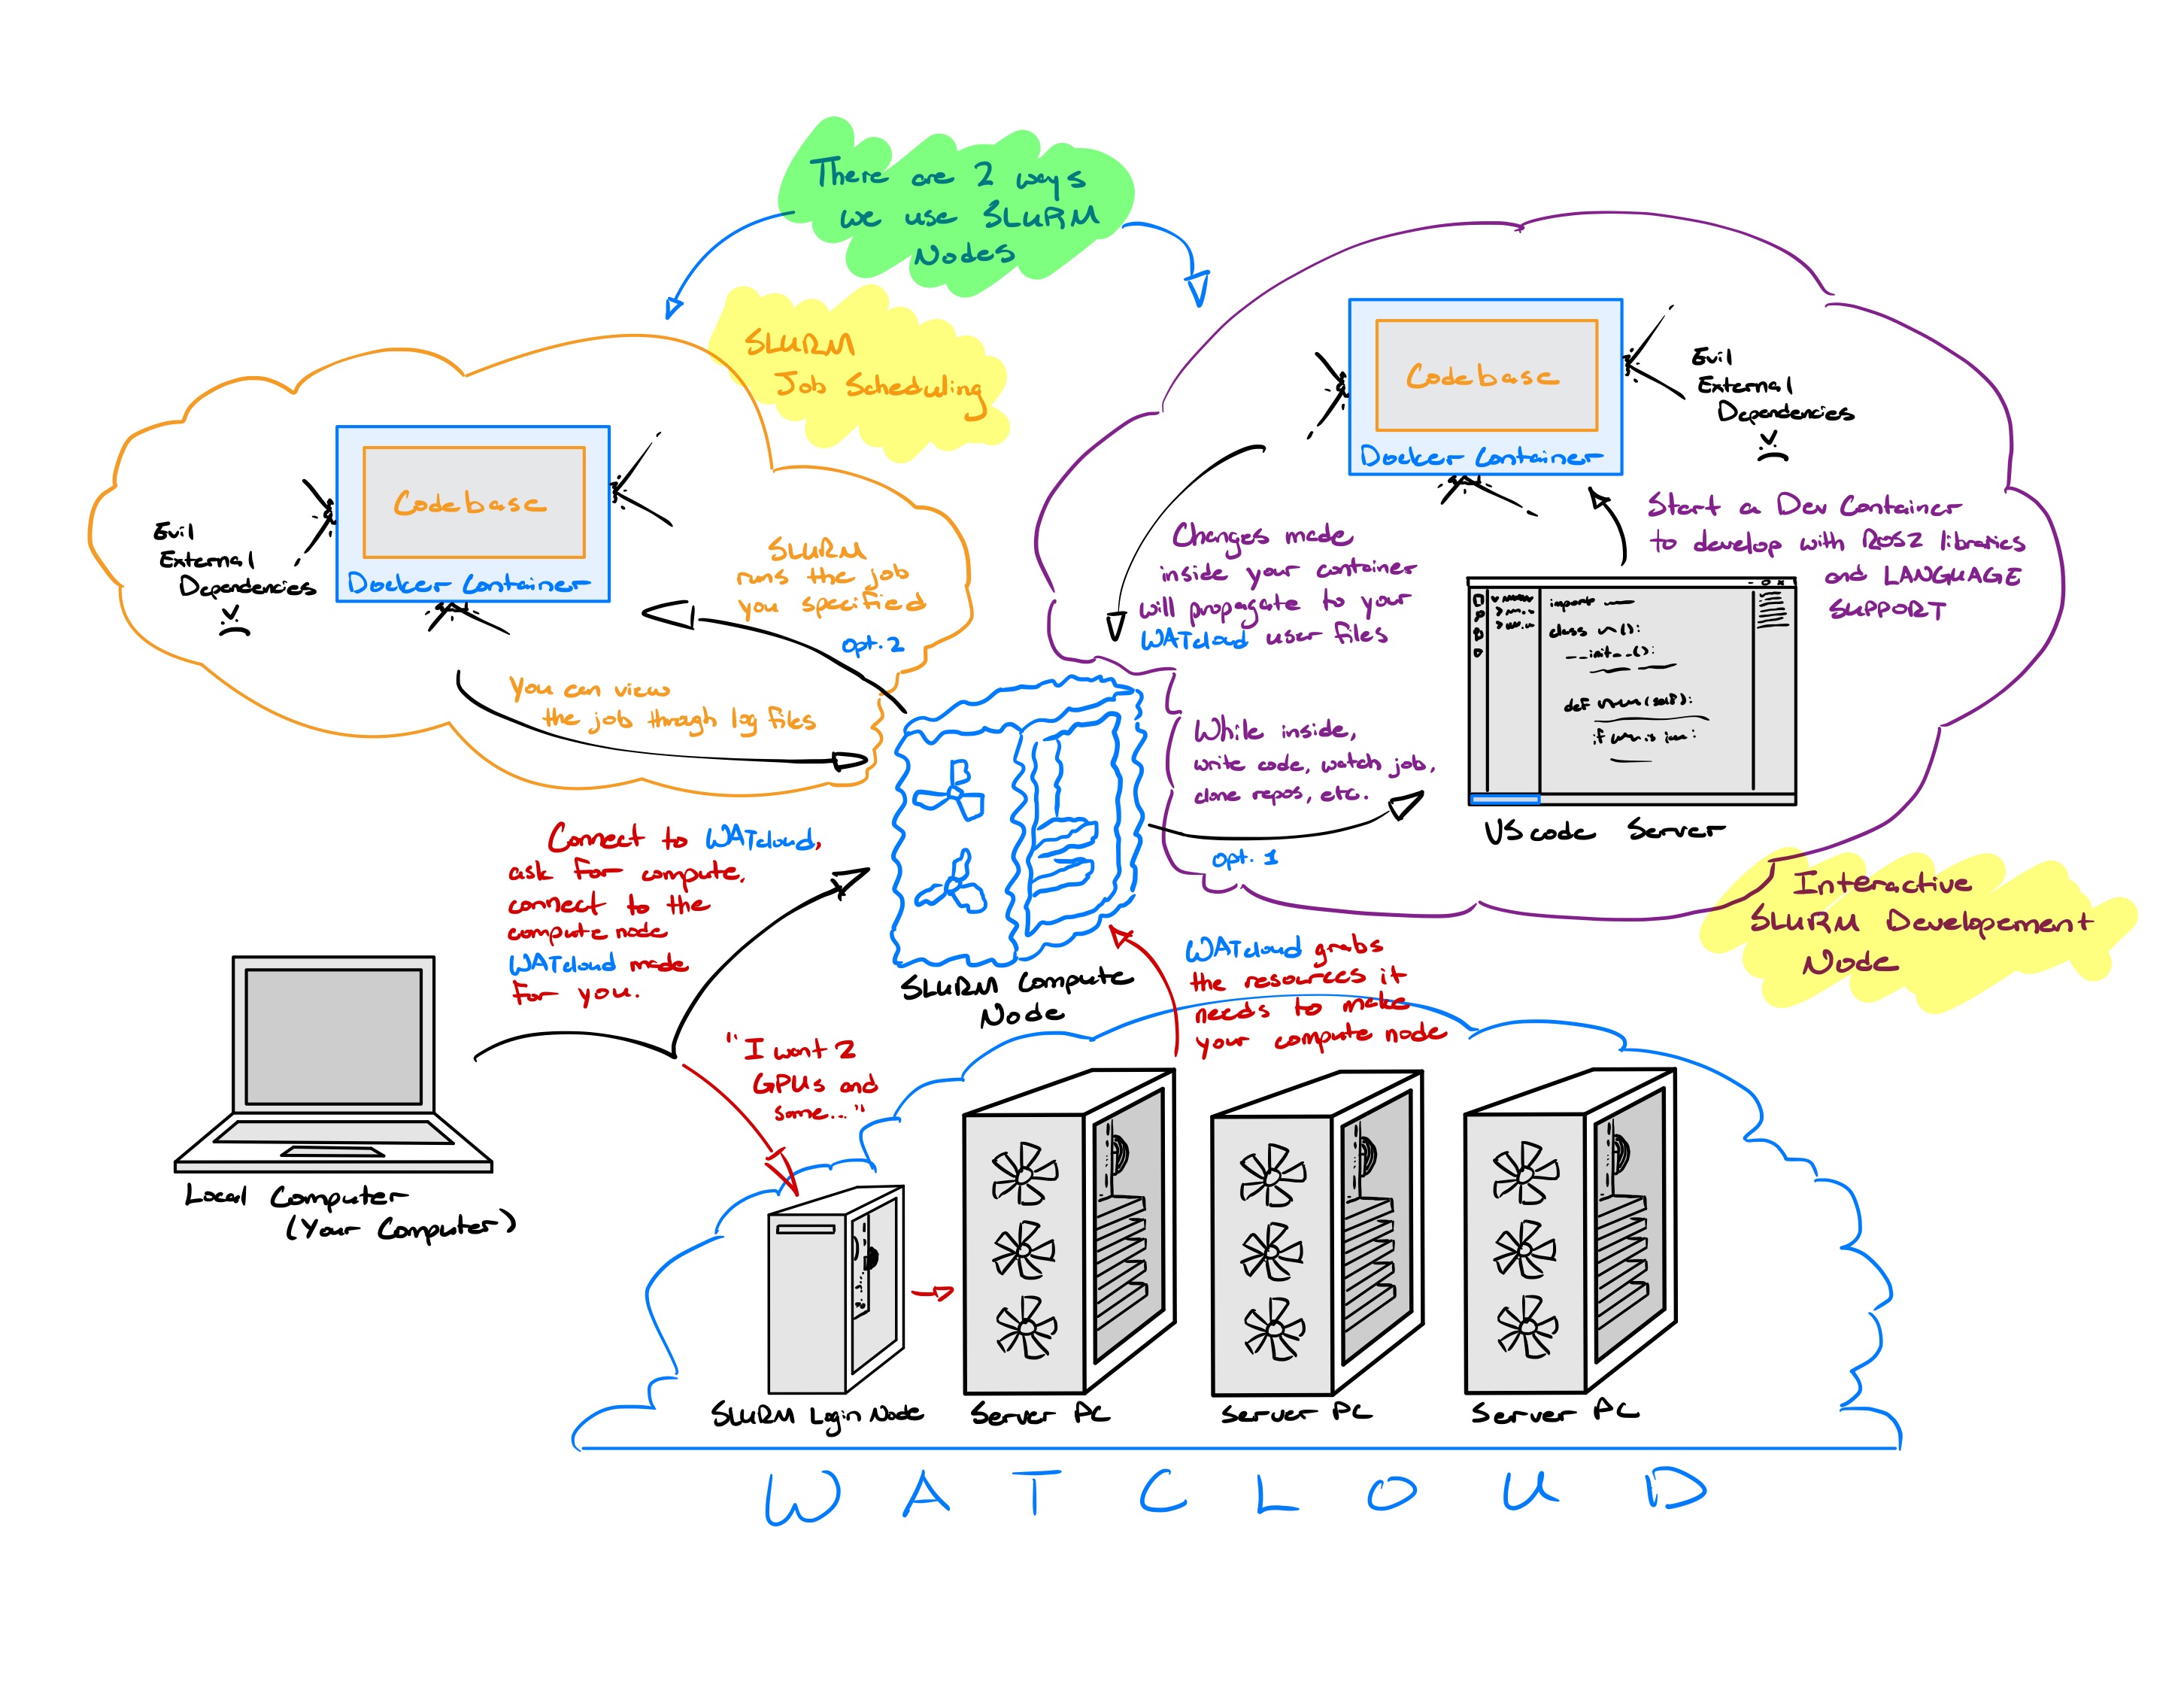
To do remote development in the Autonomous Software Division, the process can be summed up by the image below:

As shown in the image, there are two ways to use a SLURM node.
Job Scheduling vs Interactive Development
Use job scheduling when you want to run a command for a very long time (>1 day long). Use interactive development when you are actively making changes to your code and testing it.
For most WATonomous members, you would use job scheduling for tasks like training neural networks, large data processing, numerical optimization, etc. On the other hand, you would use interactive development when you are coding/testing ROS2 nodes, interacting with / visualizing live data, making code changes in general, etc.
Setting up WATcloud for ASD
This section is experimental. Please let us know of any issues on our Discord
Dealing with SSH can be quite foreign to alot of new developers. Thankfully, we provide a series of helper scripts that will make setup for WATcloud easier on you.
General Setup
This section is required so that you have proper access to our server cluster.
[Local Machine] Clone the wato_asd_tooling repository
git clone [email protected]:WATonomous/wato_asd_tooling.git[Local Machine] Generate an SSH config
If you have never created an ~/.ssh/config file before, do that now. Note, we assume that all your SSH files are stored under ~/.ssh
touch ~/.ssh/configGenerate a WATcloud SSH config. Follow the prompts whenever you get them.
cd wato_asd_tooling
bash ssh_helpers/generate_ssh_config.sh
You should now be able to connect our cluster using these commands:
ssh tr-ubuntu3
ssh derek3-ubuntu2
ssh delta-ubuntu2
[Local Machine] Setup VScode for SSH
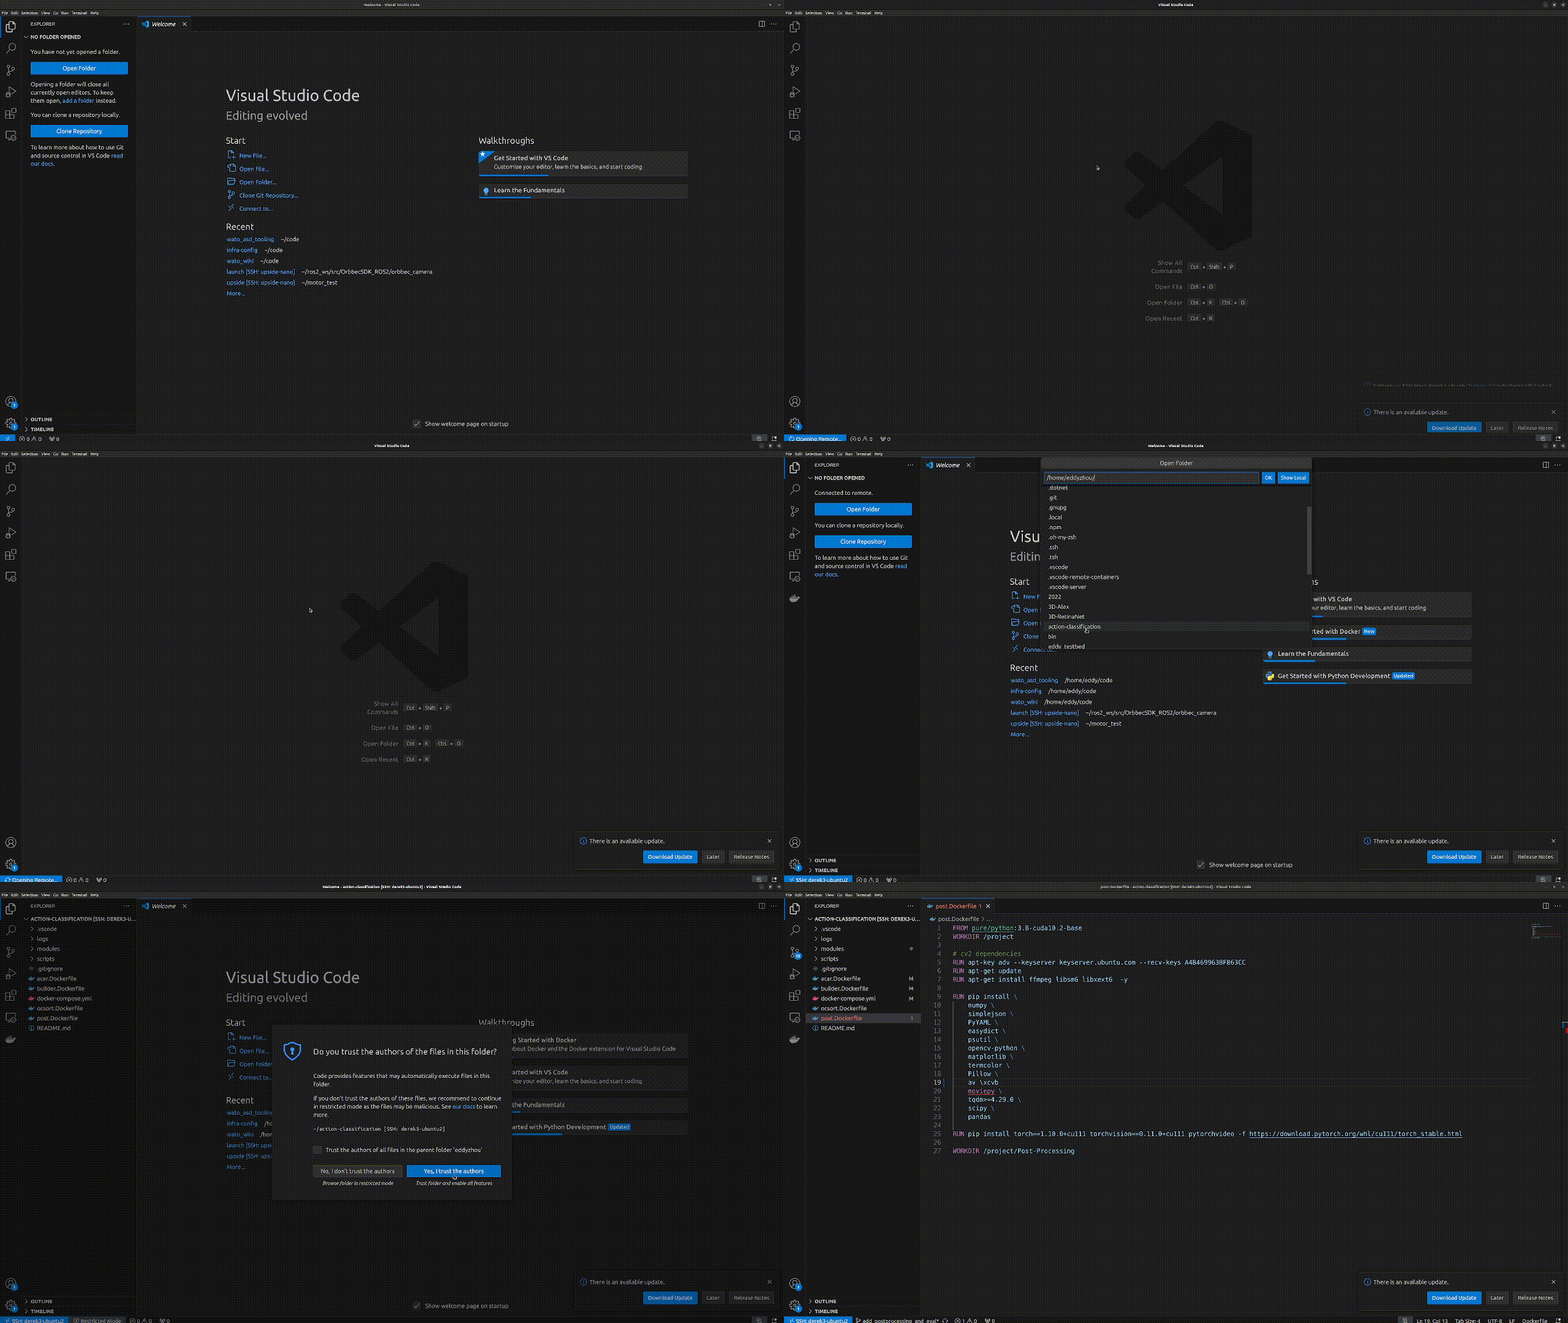
To do this, download the Remote - SSH VScode Extension. After that, you should be able to attach VScode to any of the machines.

[Local Machine] Setup Agent Forwarding
Agent forwarding lets us carry our identity onto other machines that we connect to. What this means is, you can use git commands on other machines without having to create an SSH key on each machine you connect to.
Linux/Mac: Setup agent forwarding with our helper script. Follow the prompts whenever you get them.
cd wato_asd_tooling
bash ssh_helpers/configure_agent_forwarding.sh
Mac Users Beware: Whenever you restart/shutdown your mac, your ssh keys are removed from your agent, so you’ll have to re-add them on startup.
ssh-add --apple-use-keychain $PATH_TO_PRIVATE_KEYWindows: Open Powershell (as adminstrator) and run the following command,
Set-Service -Name ssh-agent -StartupType Automatic; Start-Service ssh-agent[Host Machine] Confirm Agent Forwarding Works
You should now be able to use git on all the WATcloud machines you connect to. Confirm by running the following inside a WATcloud machine you connected to.
ssh -T [email protected]Deliverable Get SSH and SSH Agent Forwarding working.
Setup for Interactive Development
Unlike job scheduling, SLURM was not built to handle interactive development. Luckily we have a team of very talented individuals, and we managed to make interactive development work nonetheless :).
Creating an interactive development environment entails starting an SSH server inside the SLURM node, some wacky SSH key sharing, a netcast proxycommand, as well as pointing docker to a persistent filesystem. You don't have to do that though. You just need to do the following.
One-time Setup
Follow these steps if you are setting up the SLURM dev sessions for the first time, or you were using past solutions for SLURM that WATO provided.
[Host Machine] Add your public key into the SLURM node's authorized keys
Copy your public key on your local computer and paste it into the authorized_keys file on the SLURM node.
your_local_machine$ cat ~/.ssh/your_key.pub (copy the output of this)
your_local_machine$ ssh [tr-ubuntu3 or derek3-ubuntu2]
watcloud_slurm_node$ touch ~/.ssh/authorized_keys
watcloud_slurm_node$ nano ~/.ssh/authorized_keys (paste you rpublic key into here)
[Host Machine] Add the following to your bashrc in your SLURM node
watcloud_slurm_node$ nano ~/.bashrcAdd the following to the end of your ~/.bashrc file.
if [[ "$(hostname)" == *"slurm"* ]]; then
    export XDG_RUNTIME_DIR=${XDG_RUNTIME_DIR:-/tmp/run}
    export XDG_CONFIG_HOME=${XDG_CONFIG_HOME:-/tmp/config}
    export DOCKER_HOST="unix://${XDG_RUNTIME_DIR}/docker.sock"
fi
[Local Machine] Build the Computer you desire!
Use your favorite text editor to edit wato_asd_tooling/session_config.sh.
cd wato_asd_tooling
nano session_config.sh
The file itself contains descriptions of all of the parameters and how to set them.
[Local Machine] Start a SLURM Dev Session
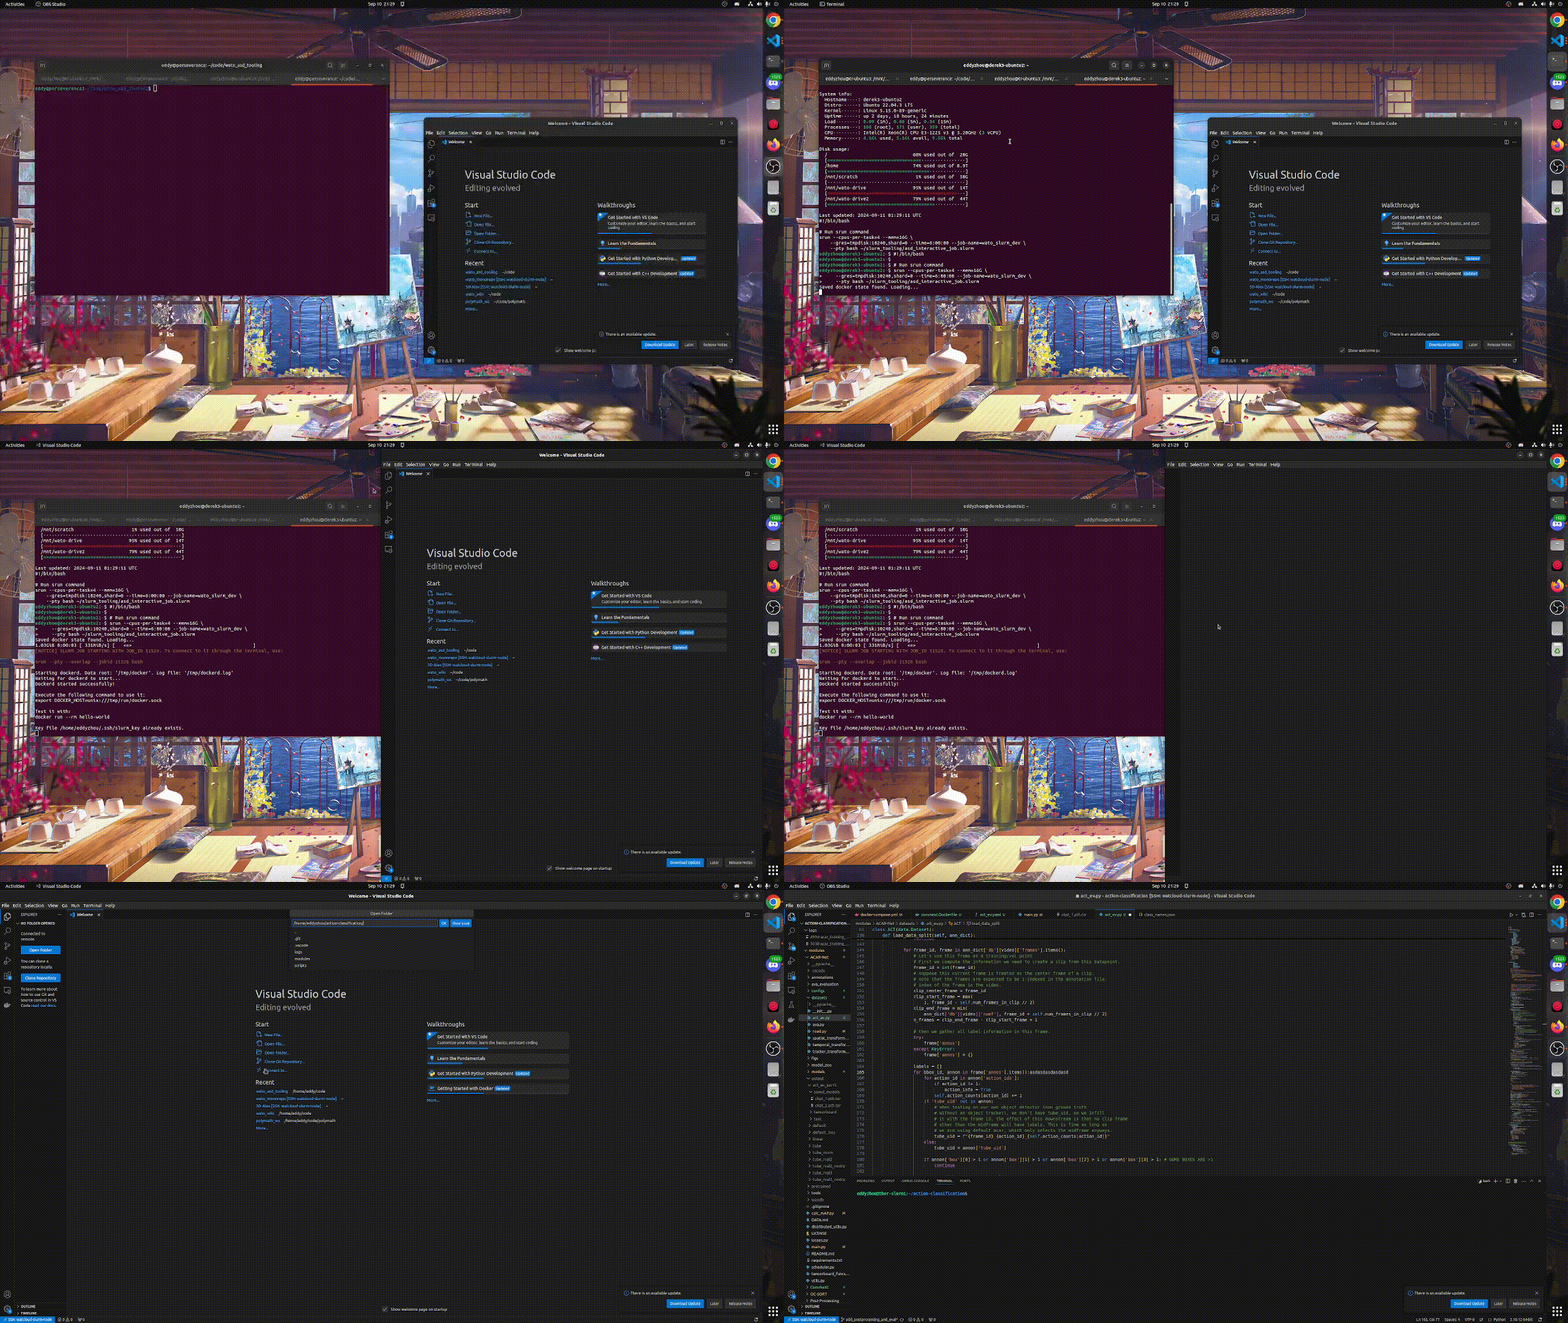
Run the helper script to startup a SLURM Dev Node. Follow all the prompts carefully.
cd wato_asd_tooling
bash start_interactive_session.shDO NOT START MORE THAN ONE DEV NODE. You have a chance of corrupting your docker filesystem. Starting more than one dev node is like building multiple computers. It is NOT the same as creating multiple terminals.
[Local Machine] Setup SSH for SLURM
Run this last helper script LOCALLY. Follow the prompts carefully.
cd wato_asd_tooling
bash ssh_helpers/setup_slurm_ssh.sh
[Local Machine] Stop the SLURM Dev Session
Stop the interactive session by hitting Ctrl+C.
Starting a SLURM Dev Session Regularly
Once you have done the one-time setup, connecting to a SLURM Dev Session is easy.
[Local Machine][Optional] Build the Computer you desire!
Use your favorite text editor to edit wato_asd_tooling/session_config.sh.
cd wato_asd_tooling
nano session_config.sh
[Local Machine] Start a SLURM Dev Session
Run the helper script to startup a SLURM Dev Node. Follow all the prompts carefully.
cd wato_asd_tooling
bash start_interactive_session.sh
[Local Machine] Connect to the SLURM Dev Session with VScode
You can connect to the SLURM Dev Session using the VScode ssh extension. The remote host is called asd-dev-session by default.

And you're good to go! Whenever you want to startup a SLURM Dev Node, start one up by running start_interactive_session.sh, and then SSH into the SLURM node through VScode.
Setup for Job Scheduling
There is no setup. Creating an SLURM job is really easy. It was what SLURM was designed for. You can view docs on SLURM in the WATcloud documentation (opens in a new tab).
Deliverable Run a SLURM batch job with 2 CPUs that counts to 60.